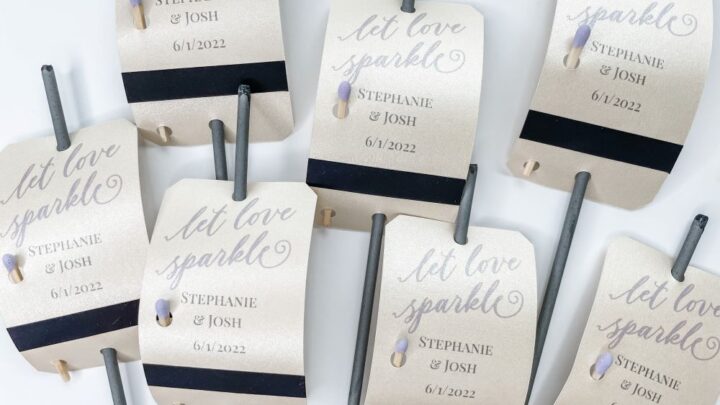
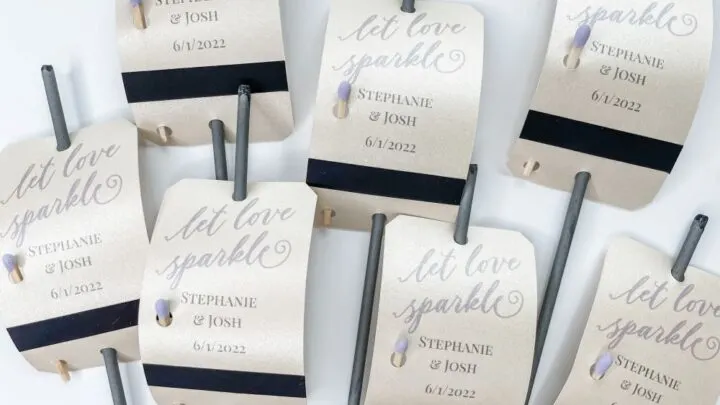

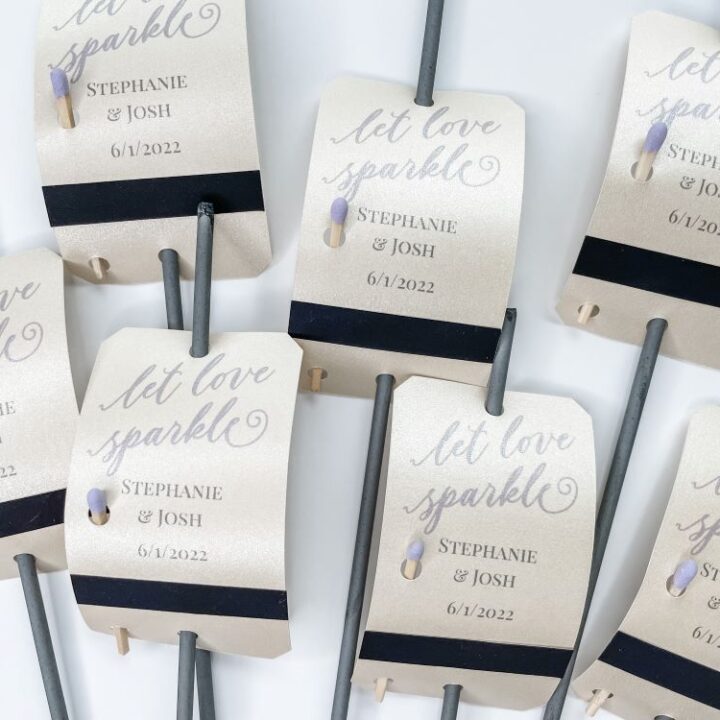
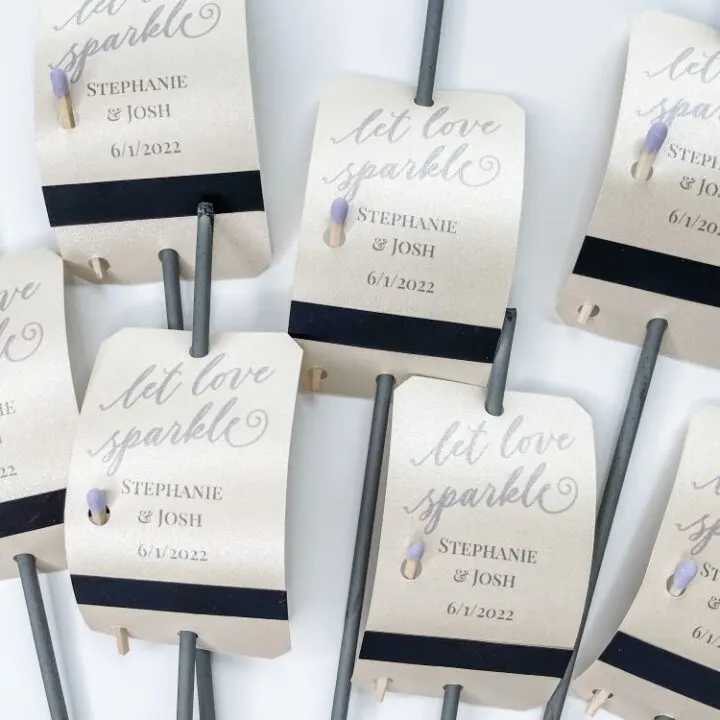
In this post we are going to walk you through how to make super functional sparkler send off tags for your wedding In this post, we will walk you through how to make super functional sparkler send off tags for your wedding exit! A sparkler exit is a fun and festive way for you and your new spouse to leave your wedding reception. These tags go right on the end of the sparklers. Best of all, the free template includes an area for a match and a strike strip. That way, your wedding guests can all light their sparklers at the same time! No waiting around for a lighter or risking sparklers dying before your photographer captures the magical shot.
We will show you two ways to create these sparkler tags. If you have a Cricut Maker, we will show you how to make the tags using the print-then-cut method. If you do not have a Cricut Maker, you can use our free, editable PDF to personalize the tags and print them at home. Instructions for the editable PDF are at the bottom of this article. You can snag the design file for this project in our design file library. If you don’t have a password yet, you can snag one here.
Before we get to the tutorial, let’s answer some FAQs.
This post includes some affiliate links for your convenience. This means that if you make a purchase, I earn a small commission at no added cost to you. For more information check out my privacy policy and disclosure.
What Kind of Sparklers Do I Purchase for a Sparkler Wedding Exit?
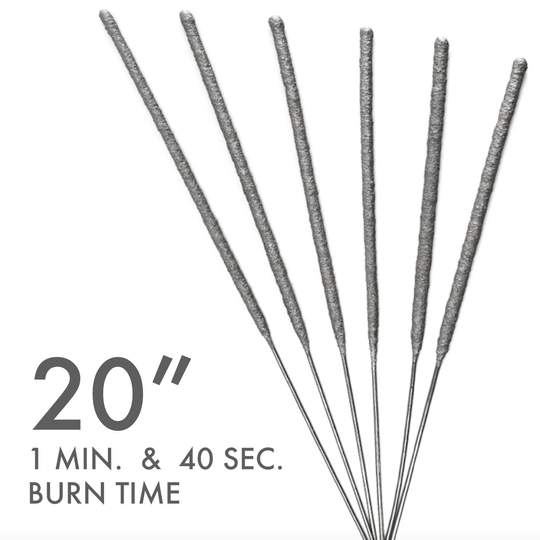
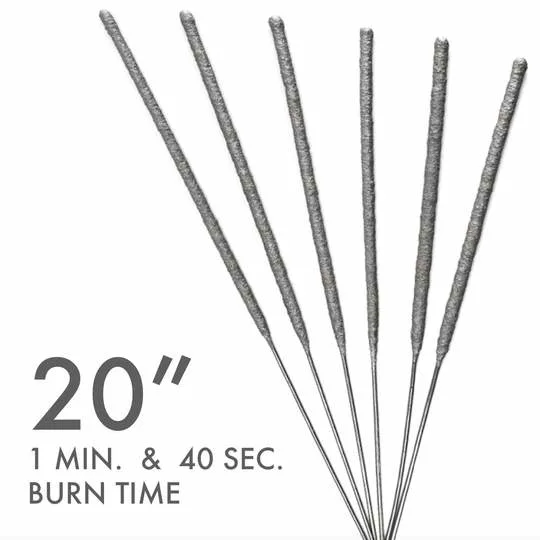
There are many places to purchase sparklers for weddings. However, there are a few things you need to check before buying the sparklers. First, be sure you aren’t purchasing the type of sparklers that you typically see around the Fourth of July. These sparklers produce a lot of smoke. Second, make sure you read the product details and understand the approximate burn time for the sparklers. Sparkler burn times range from around 50 seconds to five minutes. Generally speaking, the longer the length of the sparkler, the longer the burn time.
In our tutorial, we used 20-inch sparklers purchased from Ultra Sparklers. Our experience was great. They shipped our order quickly and arrived on time and exactly as pictured. Many other companies sell sparklers for wedding exits. Just do your due diligence by reading reviews and product descriptions.
Where to Purchase Matches With Colored Tips to Match My Wedding Color Palette?
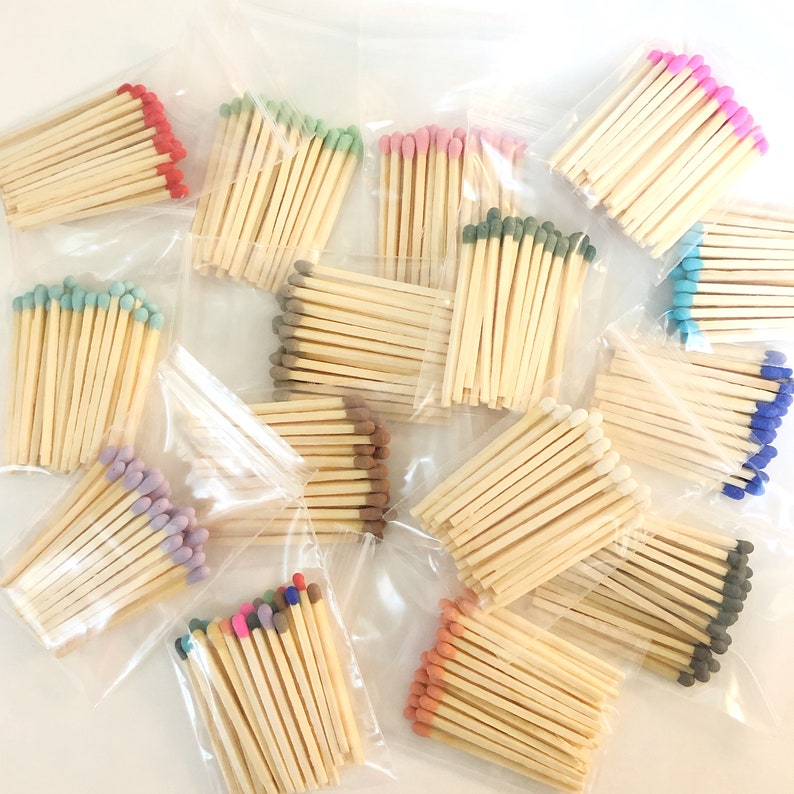
You can use regular matches with the sparkler send off tags. Personally, the bright red tip of a standard match stands out quite a bit. However, weddings are all about the small details, so why not purchase matches that go with your wedding color palette? Urban Burn Candle Co. has a fantastic selection of colored tip matches. In fact, the last time we checked, they carried 15 different color options. We tried the periwinkle purple and charcoal black.
For inspiration and support, be sure to join our free Facebook community: Cricut DIY Weddings.
How to Make Sparkler Send Off Tags With a Cricut Maker or Explore
How to Make Sparkler Send Off Tags
Learn how to make sparkler send off tags for your sparkler wedding exit.
Tools
Instructions
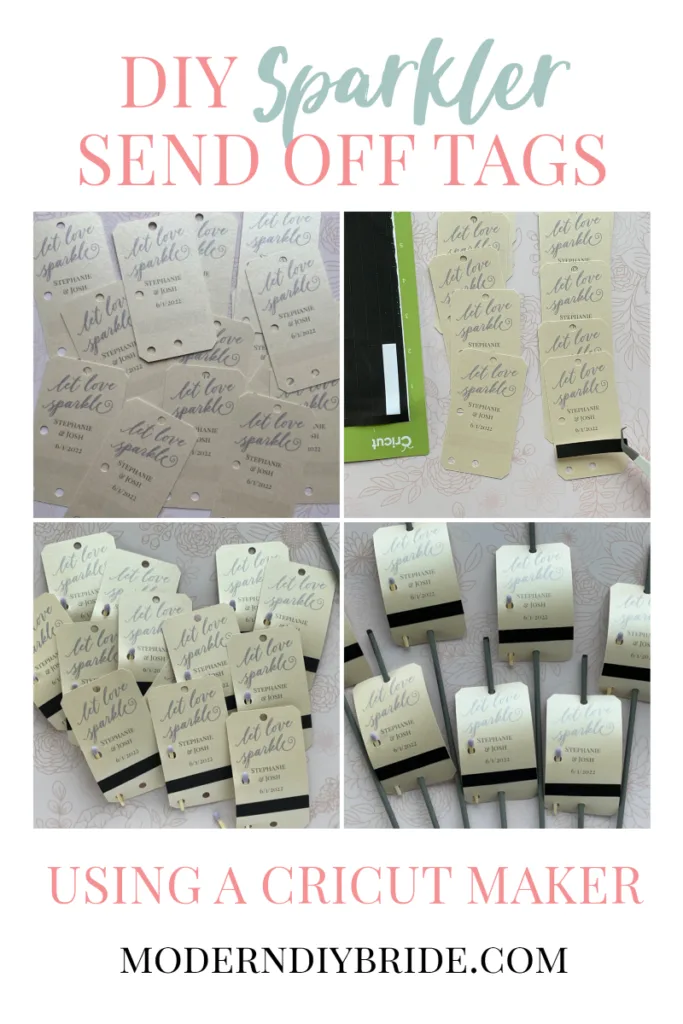
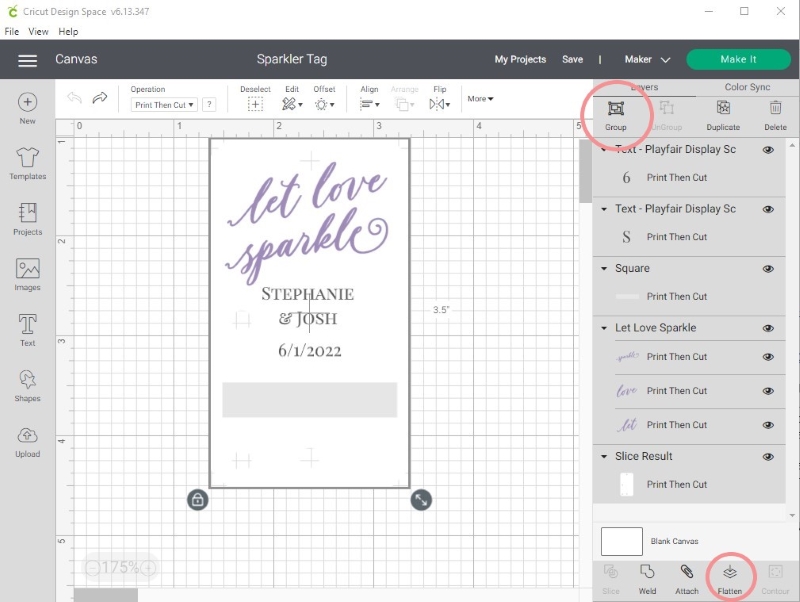
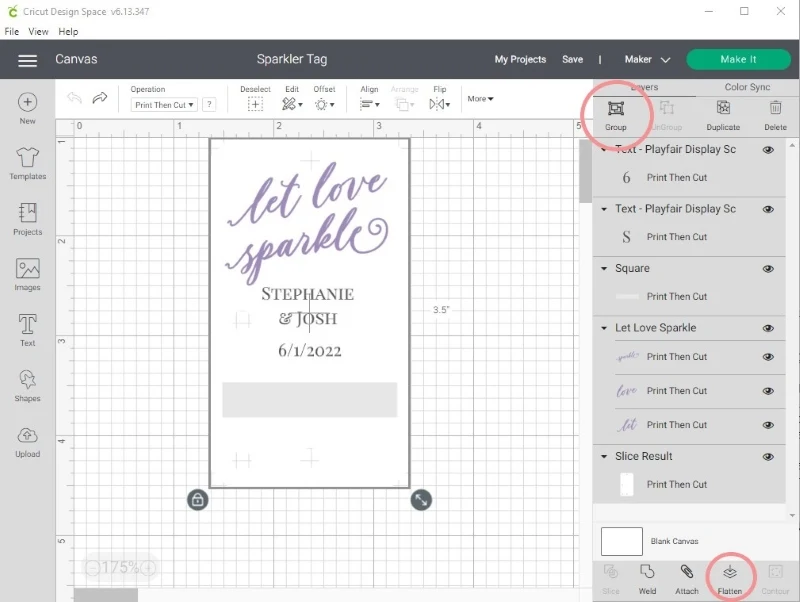
- Download the PDF for the sparkler send off tags in our free design file library. If you still need a password, you can get one here. Open the PDF and follow the link to the Sparkler Tag project. Once you've opened the project canvas in Cricut Design Space you'll want to edit the names and the wedding date. I used Playfair Display SC, a free Google font, for the names and wedding date. Feel free to adjust the font to your liking.

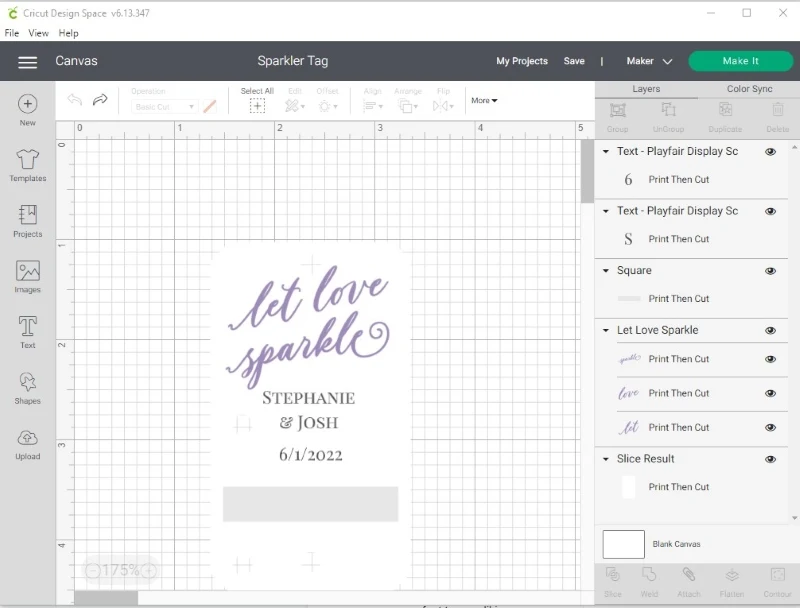
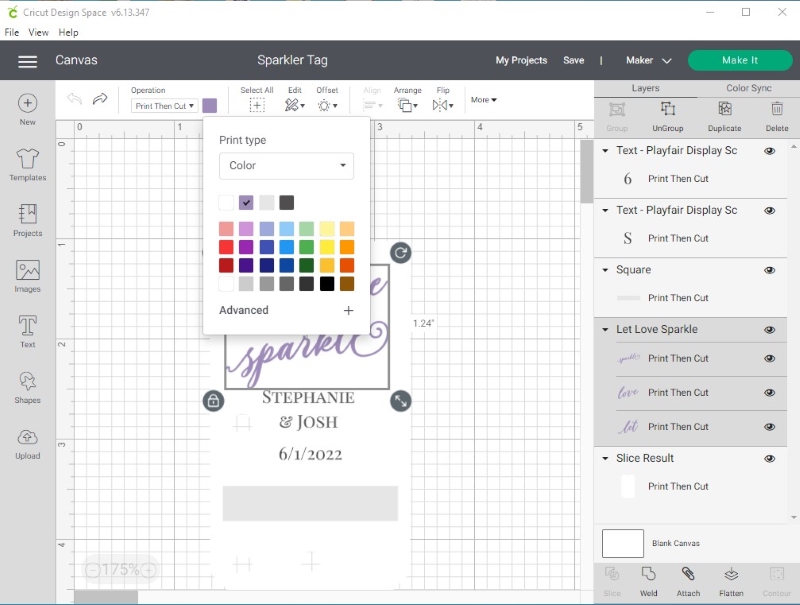
- Edit the color of the 'let love sparkle' svg and the name and wedding date to match your wedding color palette. You don't need to adjust the color of the grey rectangle. This is just a placeholder for the match strike paper. You won't see this once you have completed the project.
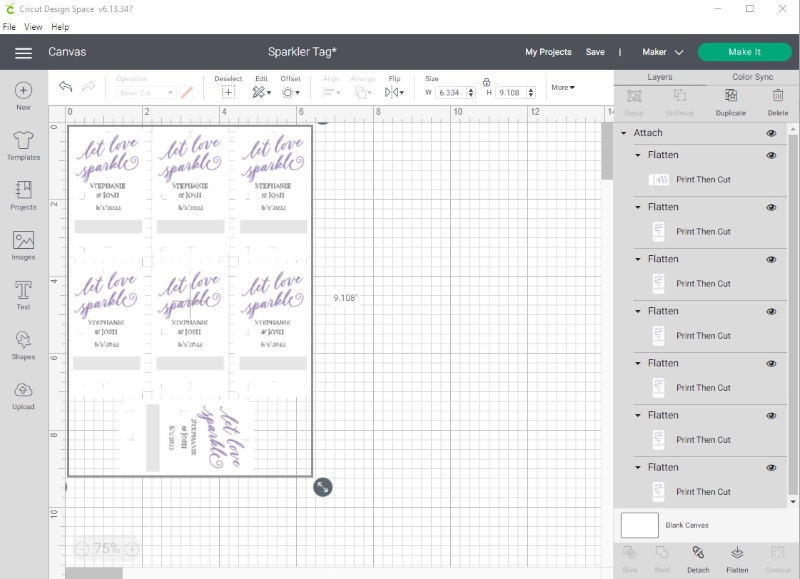
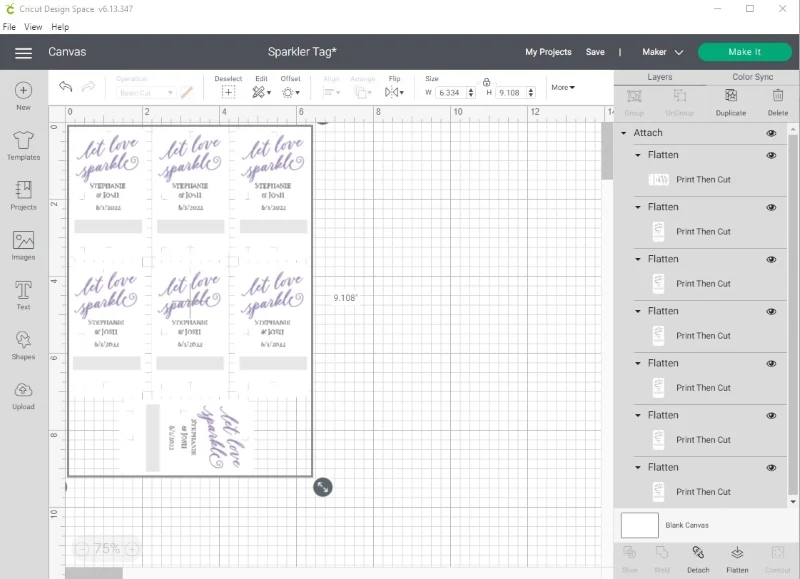
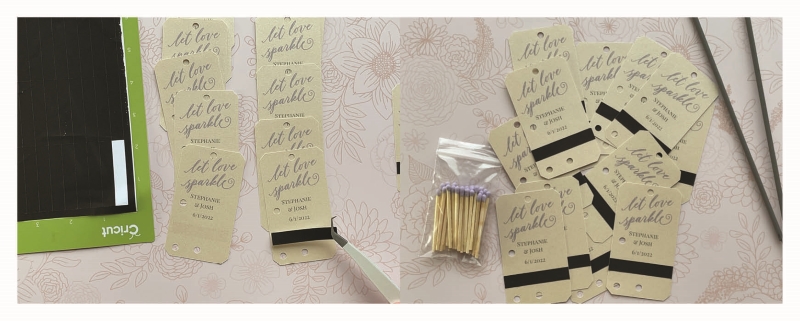
- After making the necessary adjustments to the tag, select all and group the tag and text together. Then select flatten. If you skip the flatten step your Cricut Maker will cut out each letter on the tag. To avoid this, flatten all the letters and the svg file to the tag template shape.
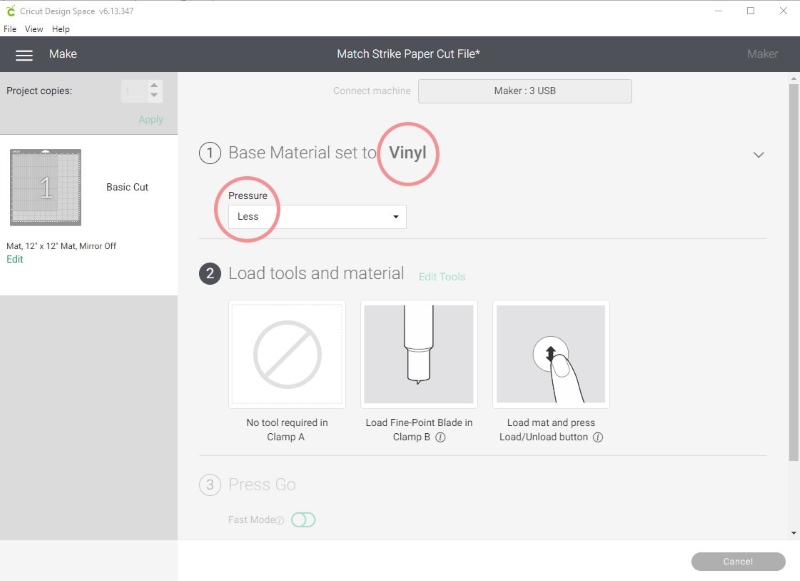
- Add a square shape and adjust the size to 6.75 by 9.25 inches. Send the rectangle to the back. The color of the rectangle doesn't matter. We are just using the rectangle as a guide to fit as many tags on one cutting mat as possible. When using Cricut's print-then-cut feature we are limited to 6.75 inches wide by 9.25 inches long for the total design space. Next, select the grouped and flattened sparkler send off tag, copy and paste the tag until you have two rows of three tags and one row with one tag rotated 90 degrees. Arrange the tags so that they are within the boundaries of the rectangle you created.
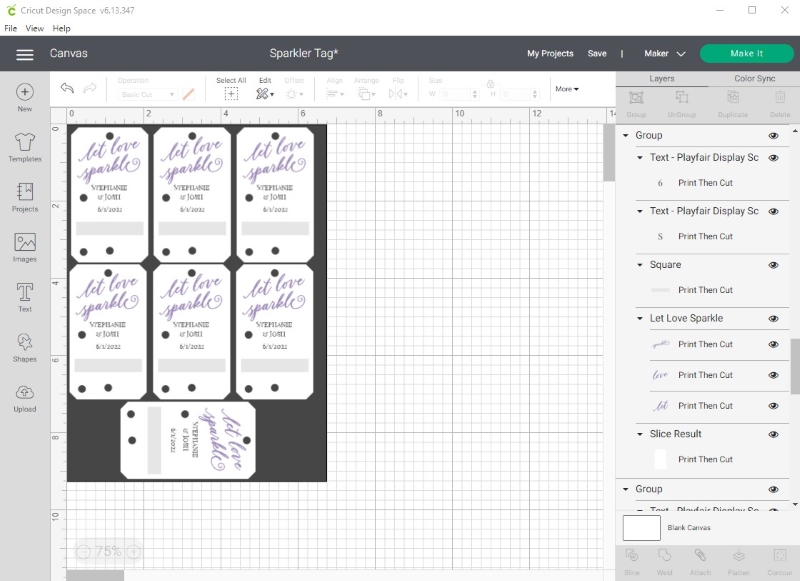
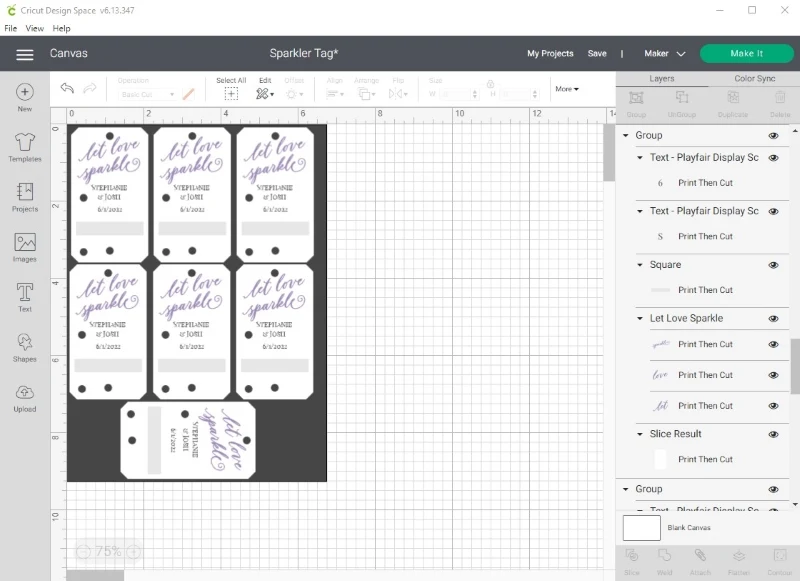
- Now select the rectangle and delete it. Select all and then attach the tags to the canvas.
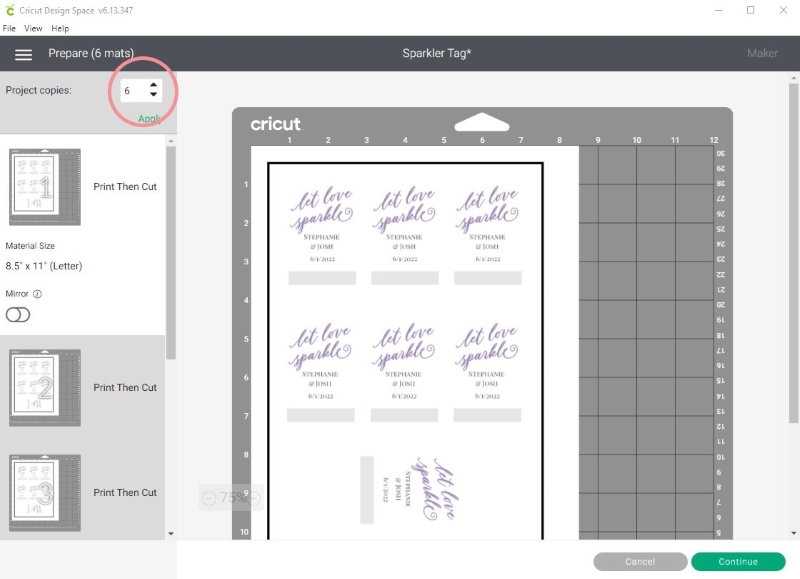
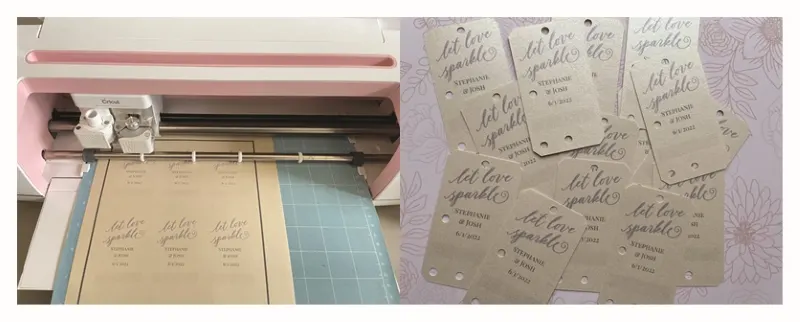
- Turn on the power to your Cricut Maker and then select make it in Cricut Design Space. In the top left corner, adjust the number of project copies to match the number of pages you'll need to print and cut. Each page holds 7 sparkler send off tags. Divide the total number of tags needed by 7 and round up to the nearest whole number. That is the number of pages you'll need to print and then cut. Be sure to also choose that number in the printer dialogue settings.

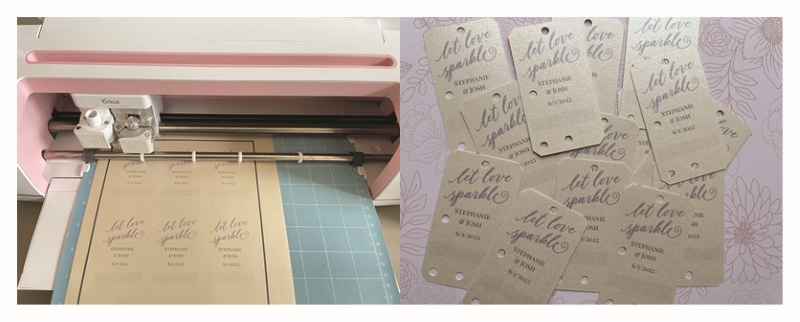
- Load 65 lb cardstock into your printer and follow the prompts in Cricut Design Space. After you have printed each page of tags, place the cardstock on a LightGrip cutting mat. Be sure the fine-point blade is securely placed in Clamp B. Load the mat and press Go. Repeat this step for each sheet of cardstock that you printed.
- Now that you've printed and cut the tags, it is time to cut the match strike paper. Before opening the next project in Cricut Design Space, take a moment and save your sparkler tag project. Now, open the link to the Match Strike Paper Cut File. I've created an svg cut file that is the exact size to fit the tag tempate. Select all and attach the file to the canvas. Dont skip this step.

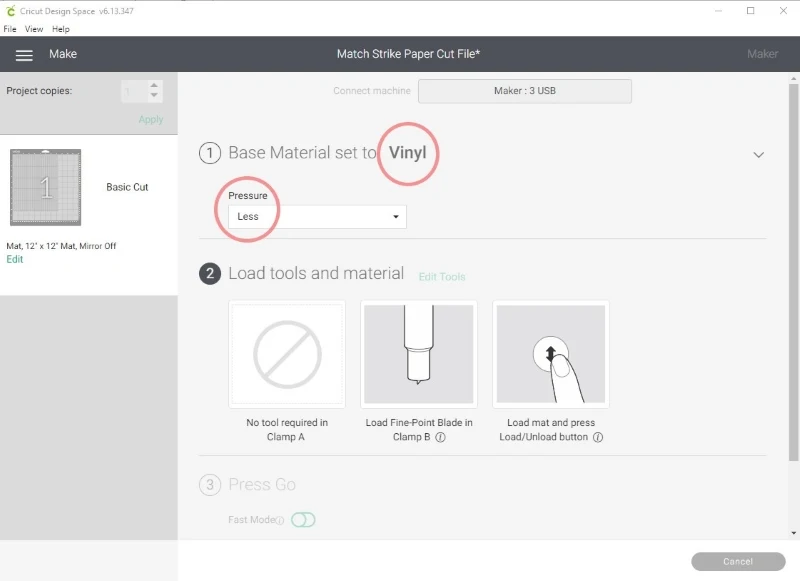
- Gently place the 8.5 x 11 inch sheet of match strike paper on a StandardGrip cutting mat. Using a Cricut Brayer Roller secure the paper on the cutting mat. The strike paper is somewhat fragile, it's likely that your sheet has some imperfections already. Don't worry, this won't be too noticeable once you assemble the tags. Now, select make it in Cricut Design Space. There isn't a preset for the strike paper, however I found the material to cut well using the Vinyl option as the base material and then changing the pressure to less. You should yield around 105 strike strips out of one 8.5 by 11 inch sheet.
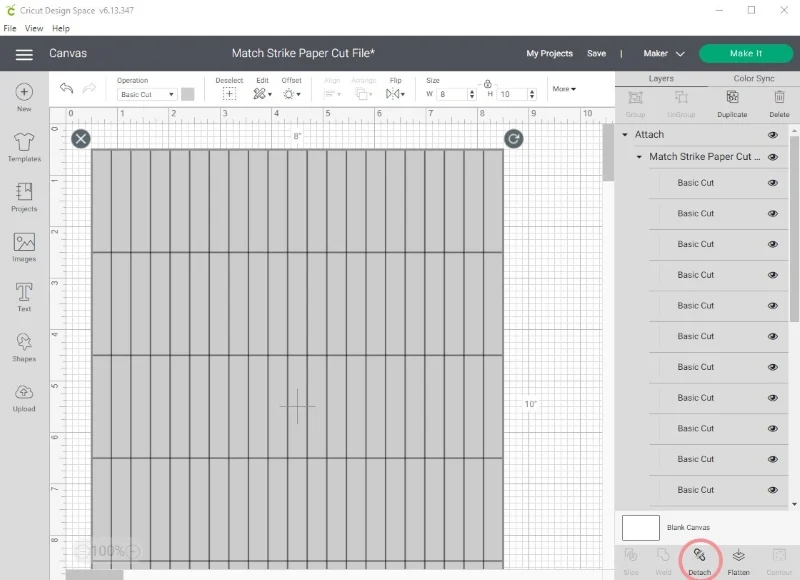
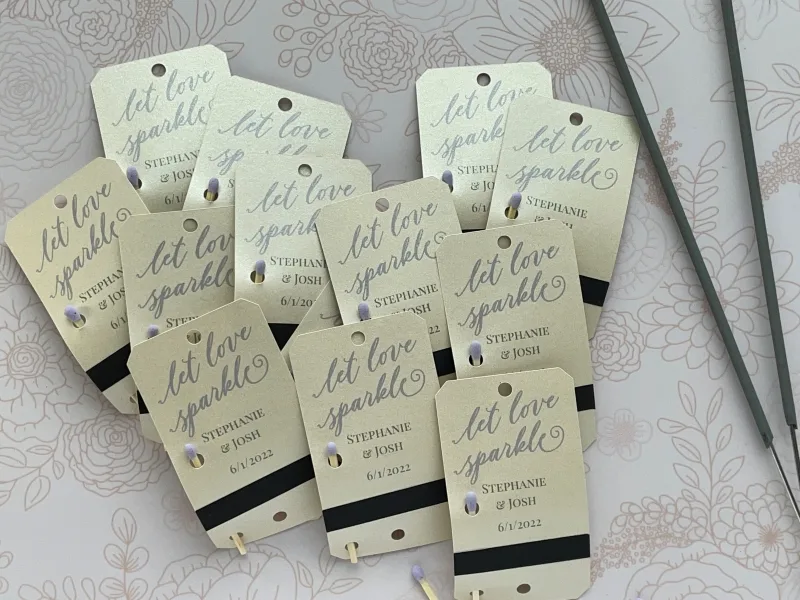
- Now it is time to assemble the sparkler send off tags. First, you'll need to place a strike strip on each of the tags. Use the grey rectangle printed on the tag as your guide. The strips should go end-to-end, the full width of the tag.

- Then, insert a match in each of the tags, using the holes on the left side of the tag.

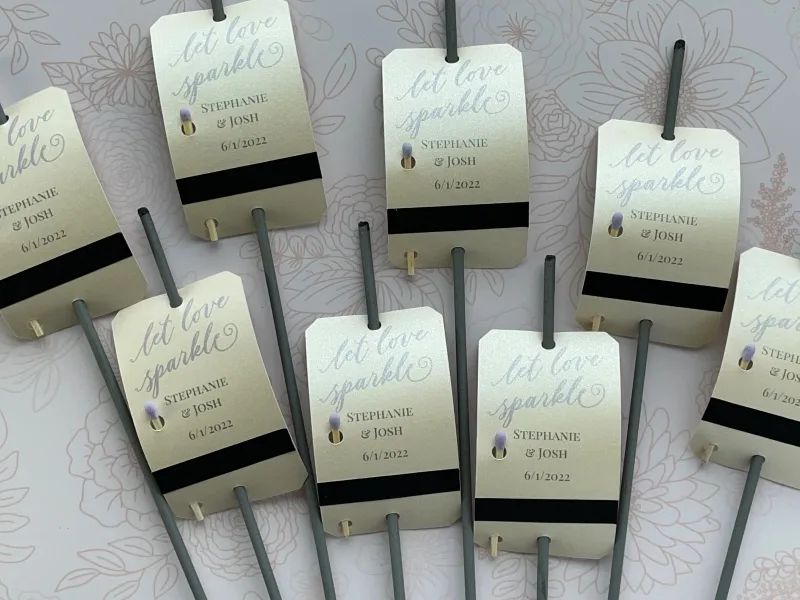
- After inserting the matches, place the tags on the sparklers through the middle bottom and middle top holes.

Notes
The design files included in this project are for personal use only. To use the template in a commercial project, please reach out to [email protected].
Recommended Products
This post includes affiliate links. This means I earn from qualifying purchases at no additional expense to you.

How to Make Sparkler Send Off Tags Without a Cricut
Once you’ve opened the PDF in the folder you downloaded from our design file library, open the file. You’ll notice there are two form fields on each tag. You only need to add your wedding details to one of the tags. The remaining tags will auto-populate with text entered into the first tag. Remember to download the Playfair Display font from Google.

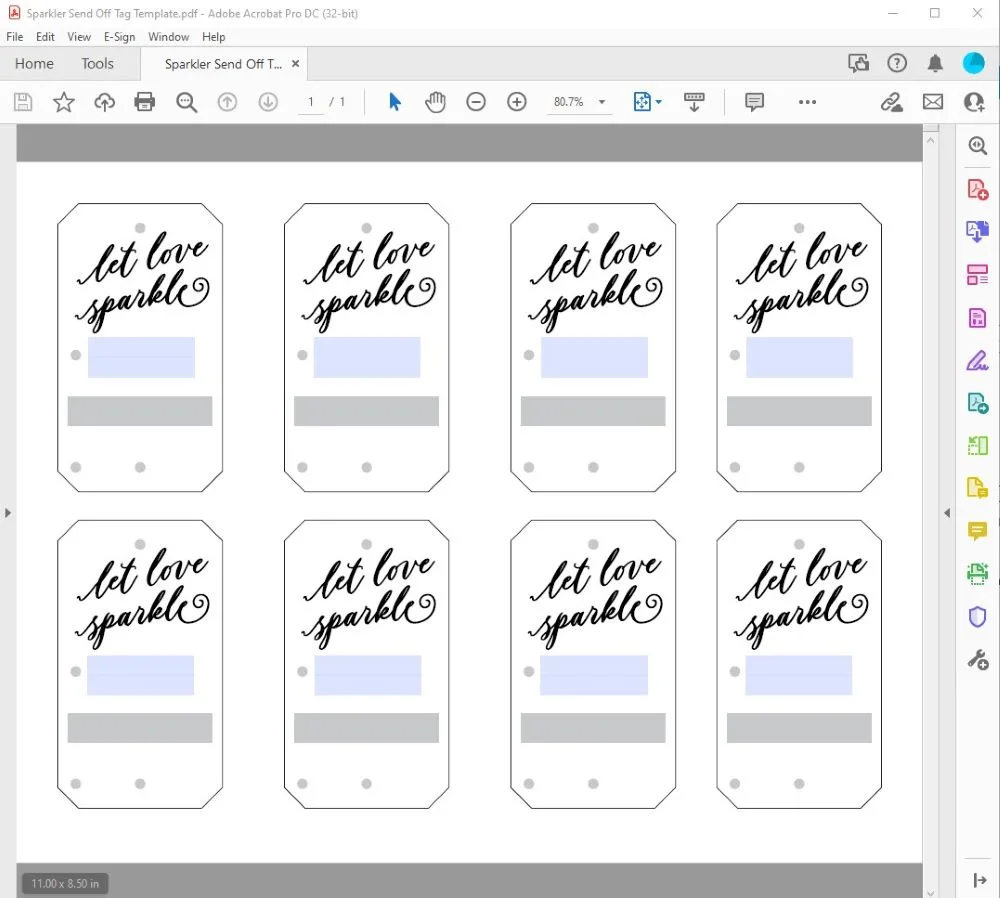
After you’ve entered your wedding details, save the file. Then, print your tags on 65 lb cardstock of your choice. Next, cut the tags out using scissors. Grab a 1/8 inch hole punch and punch out the light grey holes.
For the match strike paper you can use a ruler to cut out 2 inch wide by .4 inch long strips. Remove the backing and place the strips on the grey rectangle on the tags.
Finally, insert your matches and sparklers into each tag.
Whether you are using a Cricut cutting machine or you cut them yourself, these tags will help your sparkler wedding exit go off without a hitch!
Looking for more inspiration for a fabulous wedding send off? Check out this post.