DIY Pressed Flower Acrylic Place Cards
When it comes to hosting a memorable event or dinner party, attention to detail can elevate the experience for both you and your guests. One way to add a touch of nature's beauty to your table setting is by creating your own pressed flower place cards. These charming and personalized cards not only serve the practical purpose of indicating seating arrangements but also bring a touch of whimsy and elegance to any gathering.
Pressed flowers have been a timeless craft, allowing us to preserve the fleeting beauty of blooms in a delicate and artistic manner. With this simple and creative DIY project, you can combine the joy of crafting with the charm of nature to create unique and eye-catching place cards that will leave a lasting impression on your guests.

In this blog post, we'll guide you through the step-by-step process of making pressed flower place cards. We'll offer tips and tricks to ensure your creations are not only aesthetically pleasing but also durable. Whether you're planning a wedding, a dinner party, or a special celebration, these handmade place cards will add a personal and thoughtful touch to your table décor.
Get ready to unleash your creativity and craft beautiful place cards!
This post includes some affiliate links for your convenience. This means that if you make a purchase, I earn a small commission at no added cost to you. For more information check out my privacy policy and disclosure.
Tools and Materials
For this project, we are using our new Xtool P2 55W Desktop CO2 Laser Cutter to cut both the clear acrylic place cards and the white acrylic lettering. If you don't have a CO2 laser cutter like the P2, you can purchase place card blanks in our Etsy shop. For the lettering, use your Cricut to cut the names out of vinyl. Or, try your hand at calligraphy and use a paint pen for the names.
What you'll need:
- ⅛ inch Clear Cast Acrylic
- ⅛ inch White Cast Acrylic, permanent vinyl, or a paint pen
- Pressed Flowers
- ¼ inch Copper Tape

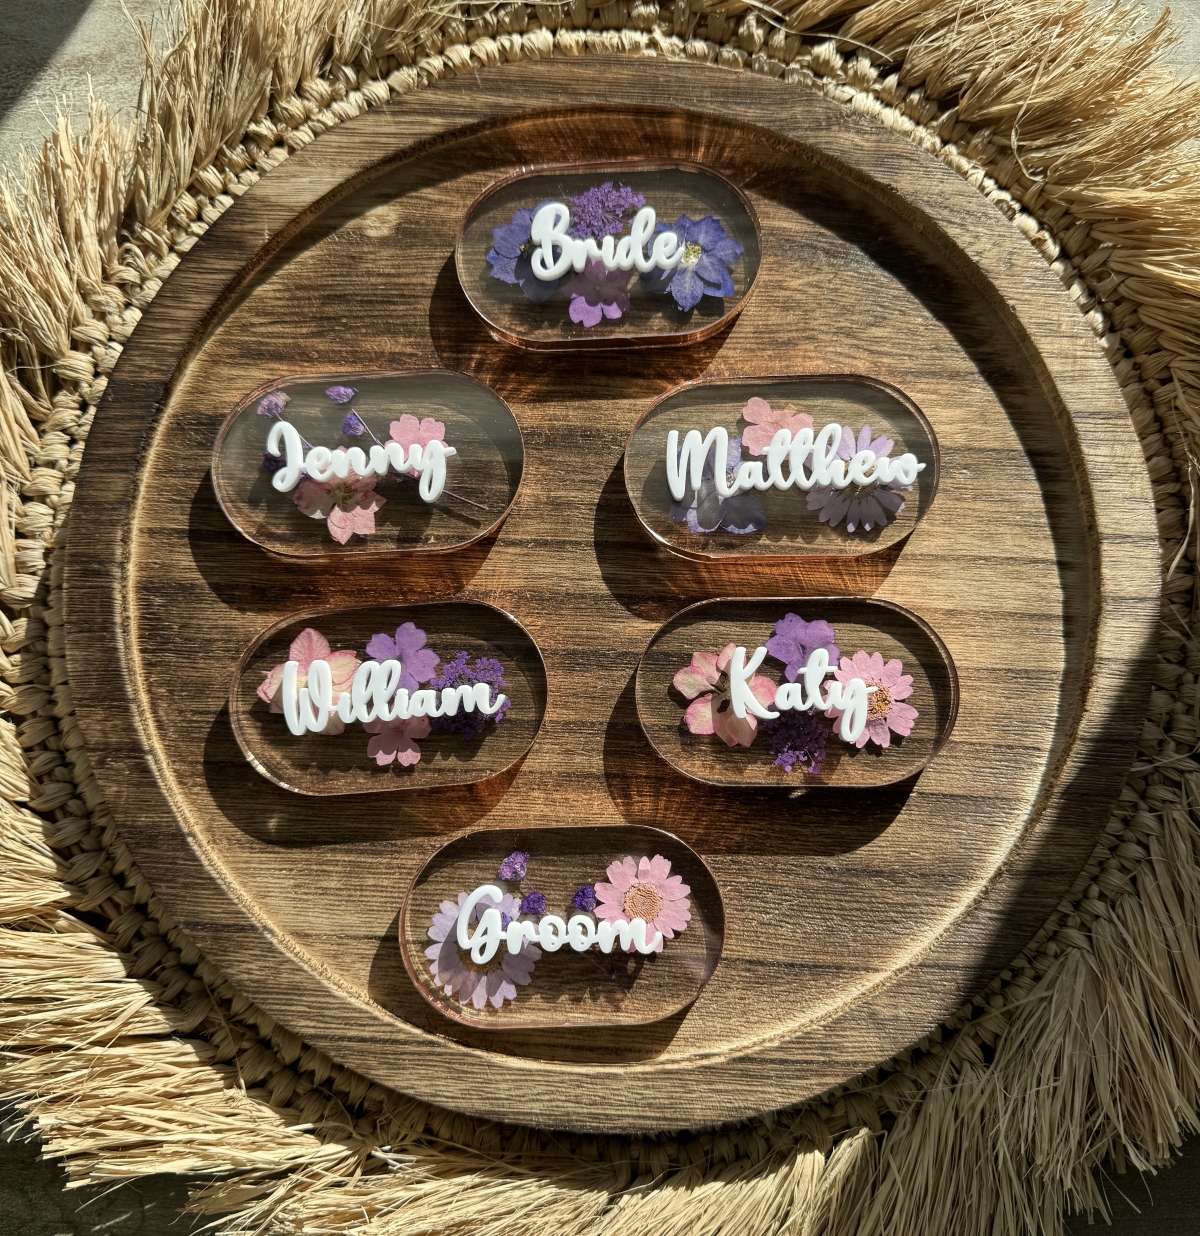
How To Make Pressed Floral Place Cards
Materials
- ⅛ inch Clear Cast Acrylic Clear (or acrylic place card blanks)
- ⅛ inch white cast acrylic (or white permanent vinyl)
- Pressed flowers
- ¼ inch copper tape
Instructions
- Cut the clear acrylic place cards. For this project, we are making 3 inch wide by 1 ¾ inch tall oval place cards. If you are purchasing your place card blanks then skip to Step 2.

- Cut out the names using your CO2 laser cutter or Cricut machine. If using a laser cutter, consider removing masking tape from one side of the acrylic and add double-sided adhesive (like ORABOND 1375 or 3M 7952). You'll need to mirror the names prior to cutting.
- Remove the paper masking from the acrylic.
- Separate the clear acrylic into two piles. Carefully place the pressed flowers onto the clear place cards from your first pile. Try not to layer the flowers as this will make it difficult to attach the second place card on top of the flowers.

- Once you’ve finished arranging the pressed flowers carefully place the clear acrylic from the second pile on top of each place card.
- Adhere the two layers of clear acrylic using ¼ inch copper tape. Carefully press the copper tape along the edges of the acrylic. This will ensure that the pressed flowers stay in place.
- Use a mild glass cleaner and microfiber cloth to gently wipe away any fingerprints from the clear acrylic.
- Attach the white acrylic (or vinyl) names to the top of your place cards.


Recommended Products
This post includes affiliate links. This means I earn from qualifying purchases at no additional expense to you.