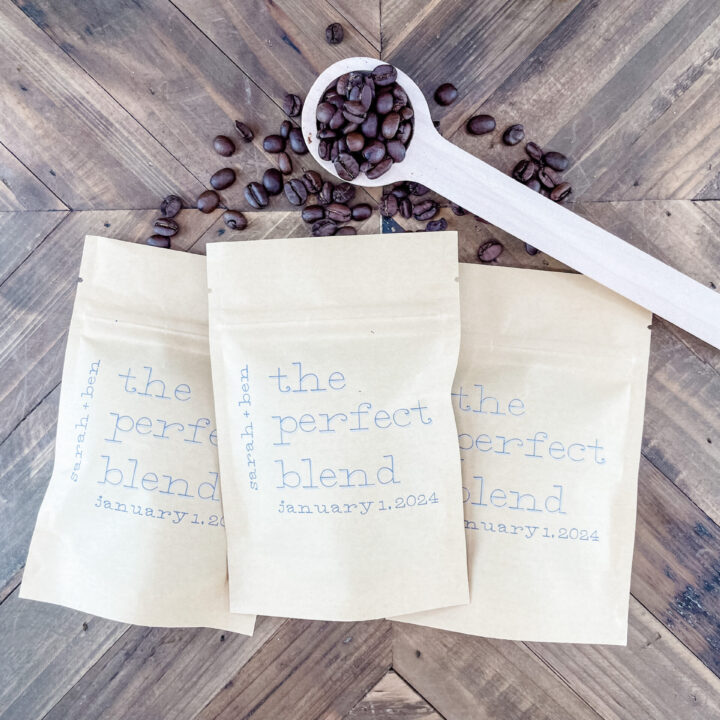
How To Make The Perfect Blend Wedding Favors

If you and your fiancé are coffee lovers, then these "the perfect blend" wedding favors are a great gift to share with your wedding guests. Using only a few materials, this do-it-yourself wedding favor is easy enough for a Cricut newbie.
This post includes some affiliate links for your convenience. This means that if you make a purchase, I earn a small commission at no added cost to you. For more information check out my privacy policy and disclosure.
What Materials Are Needed To Make The Perfect Blend Wedding Favors?

To create these coffee wedding favors with your Cricut you'll need a few things:
- Access to our project file on Cricut Design Space,
- Resealable coffee bags,
- gel writing pens and a pen adapter tool,
- masking or painters tape,
- a standard grip cutting mat, and
- a Cricut Maker or Explore.
How Much Coffee Do The Resealable Coffee Bags Hold?
For this project, we used the smallest size bag, which holds 2 ounces of coffee. If you'd like to gift your wedding guests a different quantity, the bags come in many different sizes including 1 ounce, 3 ounce, 8 ounce, and 16 ounce.
What Are The Best Pens To Use For The Perfect Blend Wedding Favor Pouches?
My go-to pen for any Cricut project is the Sakura Gelly Roll Classic fine tip gel pen. In order to use a non-Cricut brand pen with your Cricut machine, you'll need a pen adapter. Keep in mind, that using a pen adapter will void your machine warranty, so proceed with caution if that is concerning to you. Both of my machines are outside the warranty period.
For inspiration and support, be sure to join our free Facebook community: Cricut DIY Weddings.
How To Make The Perfect Blend Wedding Favors
Learn how to make "the perfect blend" wedding favors with your Cricut.
Materials
- Resealable Coffee Pouches
- Coffee Beans
Tools
- Cricut Maker or Explore
- Standard Grip Cutting Mat
- Brayer
- Masking or Painter's Tape
- Sakura Gelly Roll Classic Fine Point Pens
- Pen Adapter
Instructions
- Open the project file in Cricut Design Space. You can find the link to the file in our design file library. Still need a password? Grab one here.

- Select the design and then press detach. Adjust the names and wedding dates to match your wedding details. In this project, I used Cricut's Typewriter font. This font is available for free if you are a Cricut Access member. Choosing a single line or writing font is essential when using the pen tool. Read our Ultimate List of Single Line Fonts for Cricut article to learn more on this topic. If you don't have the Typewriter font downloaded, Design Space with us as a default font for this project. Be sure to download a single line/writing font.

You'll notice in our design that the words "the perfect blend" have a drop shadow. We like the depth this gives the letters. If you don't want the drop shadow, you can hide the three layers with the lighter pen color. - Optional Step: If your resealable coffee pouches are different than ours (2 ounces), you'll need to adjust the design size.

- After adding your names and wedding date, select all and attach.

- Duplicate the design three times. Now you'll have four copies of the perfect blend wedding favor design on your canvas.

- Now that your design is ready, you'll need to prepare your cutting mats. Place a resealable coffee pouch in each corner of the cutting mat. You should have enough room for four coffee bags.

Note: you'll need to adjust this step if you use larger bags. - Place a strip of masking or painter's tape on the top and bottom of each pouch. This will hold your bags in place while the Cricut is writing on the pouches.
- Use the brayer tool to ensure the bags are stuck to the cutting mat.
- Go to your Cricut machine and slide the star wheels to the right. This is an important step. The star wheels could damage the ziplock on the resealable bags.
- Gently remove the pen tool from Clamp A and replace it with the Gelly Roll pen tool adapter.

- Now that your cutting mat and machine are prepped, go back to Design Space and select "make it." Choose the 12 x 12 mat option. You'll need to line up all four designs to be centered over the pouches on your cutting mat.

If you use the 2-ounce bags and have placed one in each corner, you'll want to put the top two designs under the 2-inch horizontal line and center the design on the two and 10-inch vertical lines. For the bottom two designs, place under the 8-inch horizontal line and center on the two and 10-inch vertical lines. - Press continue, and then choose kraft board as your material type.

- Follow the prompts in Design Space, loading each pen in Clamp A as the software instructs.
If you have extra standard grip mats, you can prepare the mats ahead of time. When the machine has completed its process, press unload on the machine. Cricut Design Space will return to the step where you choose a material type. Choose Kraft Board again and continue this process until you have enough coffee favor bags. - Open the pouches and fill them with your preferred coffee beans. Fill the bags as close to your wedding as possible to ensure fresh coffee.


Recommended Products
This post includes affiliate links. This means I earn from qualifying purchases at no additional expense to you.
-
 AwePackage 2 oz Stand up Zipper Pouch Bag - FDA and USDA Compliant Heavy Barrier 4X6X2 Inch (50, Natural Kraft)
 -
Sakura Gelly Roll Classic, Fine Pt, Colors may vary, 5 Count
-
Stumptown Coffee Roasters, Medium Roast Organic Whole Bean Coffee - Holler Mountain 18 Ounce Bag with Flavor Notes of Citrus Zest, Caramel and Hazelnut
-
CRAVERLAND Pens Adapters for Cricut - Rainbow Pen Holders for Cricut Explore Air 3 Air 2 Air Maker 3 Maker 2 Maker to Compatible with at Least 40 Pens(15 x 2 Pack)